



day12.异常_API
课前回顾:
  1.枚举:public enum 枚举类{}
    a.枚举值: 都是public static final修饰的,但是不要写出来 -> 直接写名字
    b.构造:都是私有化
    c.使用场景:表示一种事物的状态
  2.Record类:用于操作不用改变属性值的,也没有什么逻辑实现的场景
  3.密封类:给子类限定一个范围
  4.Object:所有类的根类,所有类都会直接或者间接继承Object类
    toString: 如果直接输出对象名不想看到地址值,就重写toString
    equals:如果比较两个对象不想比较地址值,就重写equals
  5.Lombok:简化javabean开发的 -> @Data
  6.Junit:单元测试框架
    @Test:单独执行一个方法

今日重点:
  1.分清楚什么是编译时期异常,什么是运行时期异常
  2.会使用throws和try...catch处理异常
  3.会使用finally
  4.会使用BigDecimal解决double和float直接参与运算而导致的精度损失问题
  5.会使用Date日期类,Celandar日历类
  6.会使用SimpleDateFormat日期格式化类
  7.会使用LocalDate以及LocalDateTime新日期类
第一章.异常
1.异常介绍
1.概述:代码出现了不正常的现象,在java中表示出来的是一个一个的类,一个一个的对象
2.异常继承体系:
  Throwable:
    Error:错误  -> 相当于人得了绝症,需要大改,需要重新写
    Exception:异常 -> 相当于人得了感冒,可以治
        a.编译时期异常:Exception以及子类(RuntimeException除外),语法没有问题,但是当我们调用某个方法,这个方法底层给我们抛过来一个编译时期异常,表现形式就是我们一调用方法就爆红

          还可以这么区分:我们按住ctrl不放,鼠标点进我们调用的方法,此方法内部肯定会throws一个异常,我们再按住ctrl不放单击这个异常,如果这个异常的继承体系中没有RuntimeException,就一定是编译时期异常

        b.运行时期异常:RuntimeException以及子类,语法没有错误,代码写上也不爆红,但是一运行就爆红

          还可以这么区分:按住ctrl不放,鼠标点击这个异常类,如果这个异常的继承体系中有RuntimeException,就一定是运行时期异常
public class Demo01Exception {
    public static void main(String[] args) {
        //method();

        //编译时期异常
        //FileOutputStream fos = new FileOutputStream("day12_exception_api/1.txt");

        //运行时期异常
        int[] arr = new int[10];
        System.out.println(arr[100]);

    }

    public static void method() {
        method();
    }
}
编译时期异常:语法没问题,但是一调用别人的方法就爆红->原因是此方法底层给我们抛出了一个编译时期异常,其表现形式就是一调用这个方法就爆红了
比如: FileNotFoundException extends IOException
IOExecption extends Exception -> 这个继承体系中,没有RuntimeException,所以此异常就是编译时期异常运行时期异常:语法没有问题,写的时候也没事,就是一运行就报错了
比如:ArrayIndexOutOfBoundsException extends IndexOutOfBoundsException
IndexOutOfBoundsException extends RuntimeException -> 这个继承体系中,有RuntimeException,所以此异常就是运行时期异常
2.异常出现的过程
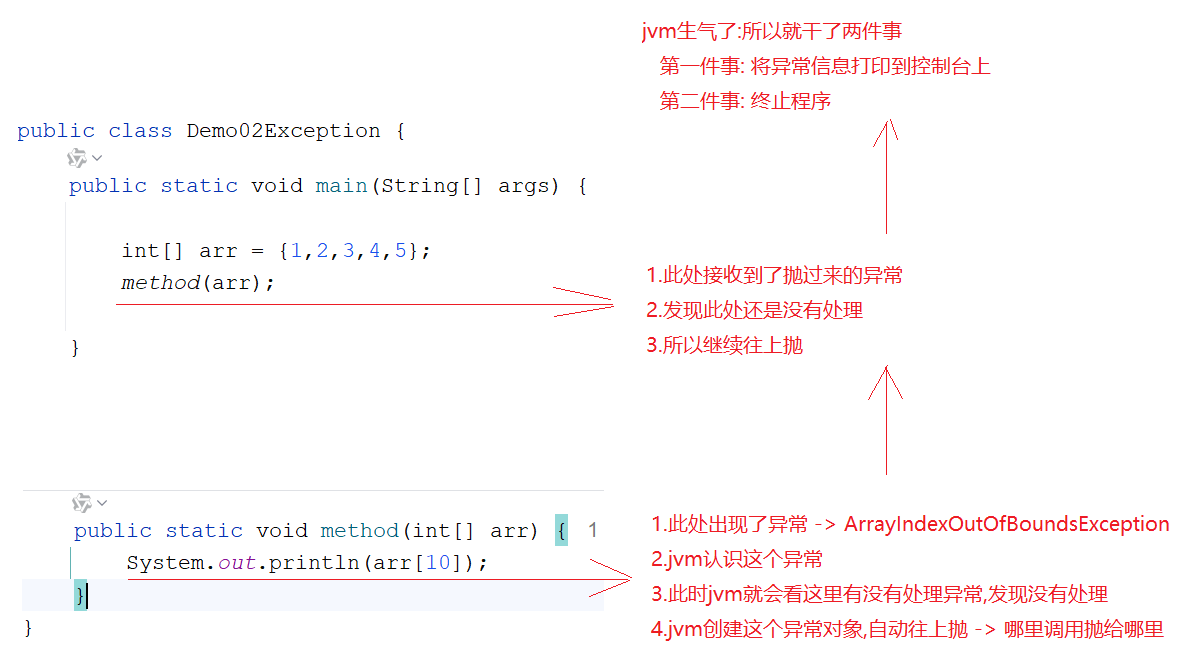
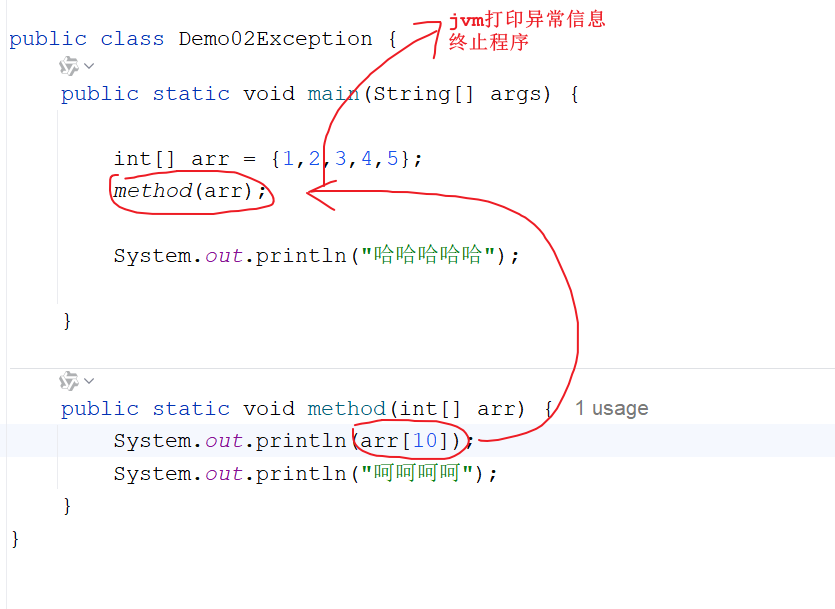
3.创建异常对象(了解)
学着破玩意儿就是为了后面学习如何处理异常
1.格式:
  throw new 异常对象()
public class Demo03Exception {
    public static void main(String[] args) {
        String s = "abc.txt1";
        insert(s);
        System.out.println("哈哈哈哈哈");

    }

    /**
     * 用到了一个String类中的方法:
     *   boolean endsWith(String str)
     *   判断字符串是否以指定的串儿结尾
     *   比如: "abc.txt".endsWith(".txt") -> true
     * @param s
     */
    public static void insert(String s) {
        if (!s.endsWith(".txt")){
            throw new NullPointerException();
        }
        System.out.println("呵呵呵呵");
    }
}
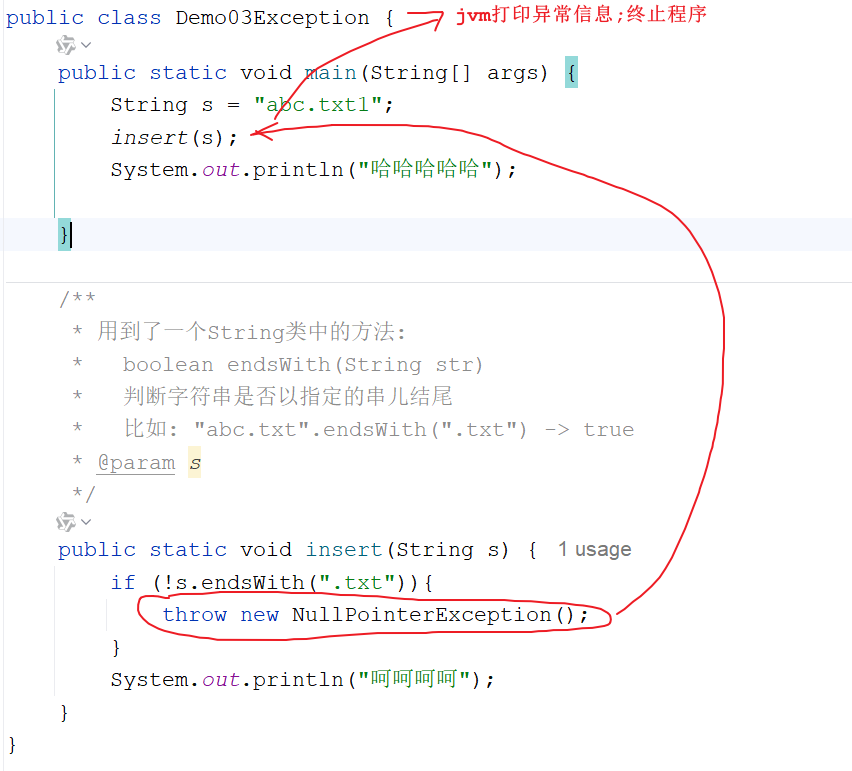
4.异常处理方式(重点)
1 异常处理方式一_throws
1.格式: 在参数后面 -> throws 异常
2.作用: 往上抛异常
3.弊端: 如果无脑往上throws,会出现因为一个功能有异常,而导致其他下面的功能都废了
public class Demo04Exception {
    public static void main(String[] args) throws FileNotFoundException {
        String s = "abc.txt1";
        insert(s);
        System.out.println("删除功能");
        System.out.println("修改功能");
        System.out.println("查询功能");

    }

    public static void insert(String s) throws FileNotFoundException {
        if (!s.endsWith(".txt")){
            throw new FileNotFoundException("文件找不到");
        }
        System.out.println("呵呵呵呵");
    }
}
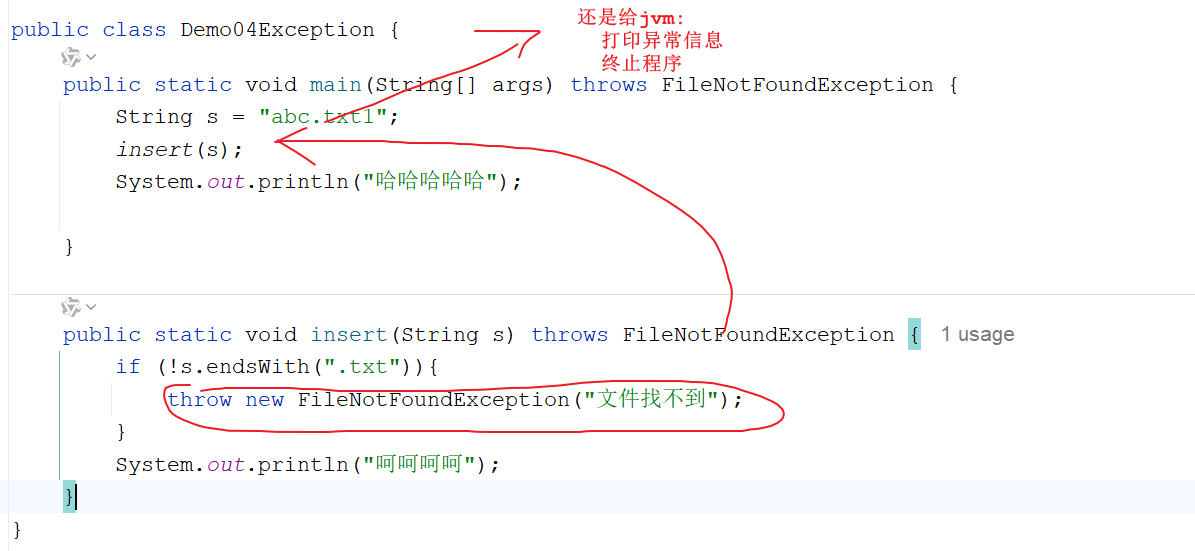
2 异常处理方式一_throws多个异常
1.格式:
  throws 异常1,异常2...
2.注意:
  如果throws多个异常的时候,多个异常之间有子父类继承关系,我们只需要throws父类异常即可
public class Demo05Exception {
    public static void main(String[] args) throws /*FileNotFoundException,*/ IOException{
        String s = "abc.txt1";
        insert(s);
        System.out.println("删除功能");
        System.out.println("修改功能");
        System.out.println("查询功能");

    }

    public static void insert(String s) throws /*FileNotFoundException,*/ IOException {
        if (s==null){
            throw new IOException();
        }

        if (!s.endsWith(".txt")){
            throw new FileNotFoundException("文件找不到");
        }
        System.out.println("呵呵呵呵");
    }
}
3.异常处理方式二_try…catch
1.格式:
  try{
      可能出现的异常代码
  }catch(异常 对象名){
      异常处理方案 -> 直接打印异常 -> 将异常打印到了日志文件中去
  }

2.特点:
  a.如果try中有异常,就走catch捕获,如果捕获到了相当于处理了,没有捕获到相当于没有处理,就会默认往上抛,最终给jvm
  b.用try...catch,如果一个功能一旦触发了异常,不会影响下面功能的执行
public class Demo06Exception {
    public static void main(String[] args) {
        String s = "abc.txt1";
        try {
            //String str = null;
            //System.out.println(str.length());//空指针异常
            insert(s);
        } catch (FileNotFoundException e) {
            e.printStackTrace();//打印详细的异常信息
        }
        System.out.println("删除功能");
        System.out.println("修改功能");
        System.out.println("查询功能");

    }

    public static void insert(String s) throws FileNotFoundException {
        if (!s.endsWith(".txt")){
            throw new FileNotFoundException("文件找不到");
        }
        System.out.println("呵呵呵呵");
    }
}
4.异常处理方式二_多个catch
1.格式:
  try{
      可能出现的异常代码
  }catch(异常 对象名){
      异常处理方案 -> 直接打印异常 -> 将异常打印到了日志文件中去
  }catch(异常 对象名){
      异常处理方案 -> 直接打印异常 -> 将异常打印到了日志文件中去
  }catch(异常 对象名){
      异常处理方案 -> 直接打印异常 -> 将异常打印到了日志文件中去
  }catch(异常 对象名){
      异常处理方案 -> 直接打印异常 -> 将异常打印到了日志文件中去
  }...

2.注意:
  如果catch的多个异常之间有子父类继承关系,我们可以直接catch父类异常
 public class Demo07Exception {
    public static void main(String[] args) {
        String s = "abc.txt1";
        try {
            insert(s);
        }catch (IOException e) {
            e.printStackTrace();
        }

        System.out.println("删除功能");
        System.out.println("修改功能");
        System.out.println("查询功能");

    }

    public static void insert(String s) throws FileNotFoundException, IOException {
        if (s == null) {
            throw new IOException();
        }

        if (!s.endsWith(".txt")) {
            throw new FileNotFoundException("文件找不到");
        }
        System.out.println("呵呵呵呵");
    }
}
如果成功catch到了异常,不会影响后续的代码执行
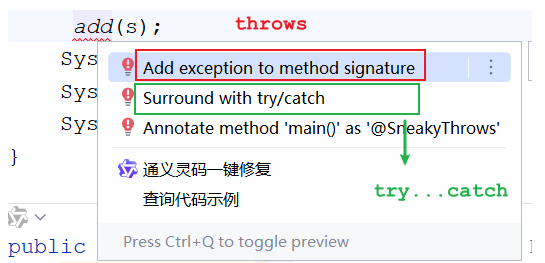
1.运行时期异常一般不用处理,因为一旦出现运行时期异常,肯定是代码写的有问题,我们只需要修改代码即可
2.编译时期异常需要处理,如果不处理代码中会有爆红,那么代码不管是否触发异常我们都运行不了
3.怎么处理: alt+回车
5.finally关键字
1.概述:不管有没有捕获到异常,都一定会走的代码块
2.使用:配合try...catch使用
  try{
      可能出现的异常代码
  }catch(异常 对象名){
      异常处理方案 -> 直接打印异常 -> 将异常打印到了日志文件中去
  }finally{
      不管是否捕获到异常都会执行的代码
  }
public class Demo08Exception {
    public static void main(String[] args) {
        String s = "abc.txt1";
        try {
            String str = null;
            System.out.println(str.length());//空指针异常
            insert(s);
        } catch (FileNotFoundException e) {
            e.printStackTrace();//打印详细的异常信息
        }finally {
            System.out.println("我一定会执行的");
        }
        System.out.println("删除功能");
        System.out.println("修改功能");
        System.out.println("查询功能");

    }

    public static void insert(String s) throws FileNotFoundException {
        if (!s.endsWith(".txt")){
            throw new FileNotFoundException("文件找不到");
        }
        System.out.println("呵呵呵呵");
    }
}
使用场景:
finally中的代码一般都是用作释放资源使用->说白了就是咱们的对象只要创建出来,后续代码是否执行成功我们最后都要将其释放,释放内存空间
为啥有的对象需要再finally中手动释放呢?堆内存中的对象,一般都是由GC(垃圾回收器)释放,但是有些对象GC是回收不了的,比如:Socket,IO流,数据库连接对象(Connection)
public class Demo09Exception {
    public static void main(String[] args) {
        int result = method();
        System.out.println(result);
    }

    public static int method() {
        try {
            String s = null;
            System.out.println(s.length());//空指针异常
            return 2;
        } catch (Exception e) {
            return 1;
            //System.out.println("哈哈哈哈");
        } finally {
            System.out.println("我一定要执行");
            //return 3;
        }
    }
}
6.抛异常时注意的事项(扩展)
1.父类方法抛异常了,子类重写之后要不要抛?   可抛可不抛
2.父类方法没有抛异常,子类重写之后要不要抛? 不要抛
7.try_catch和throws的使用时机
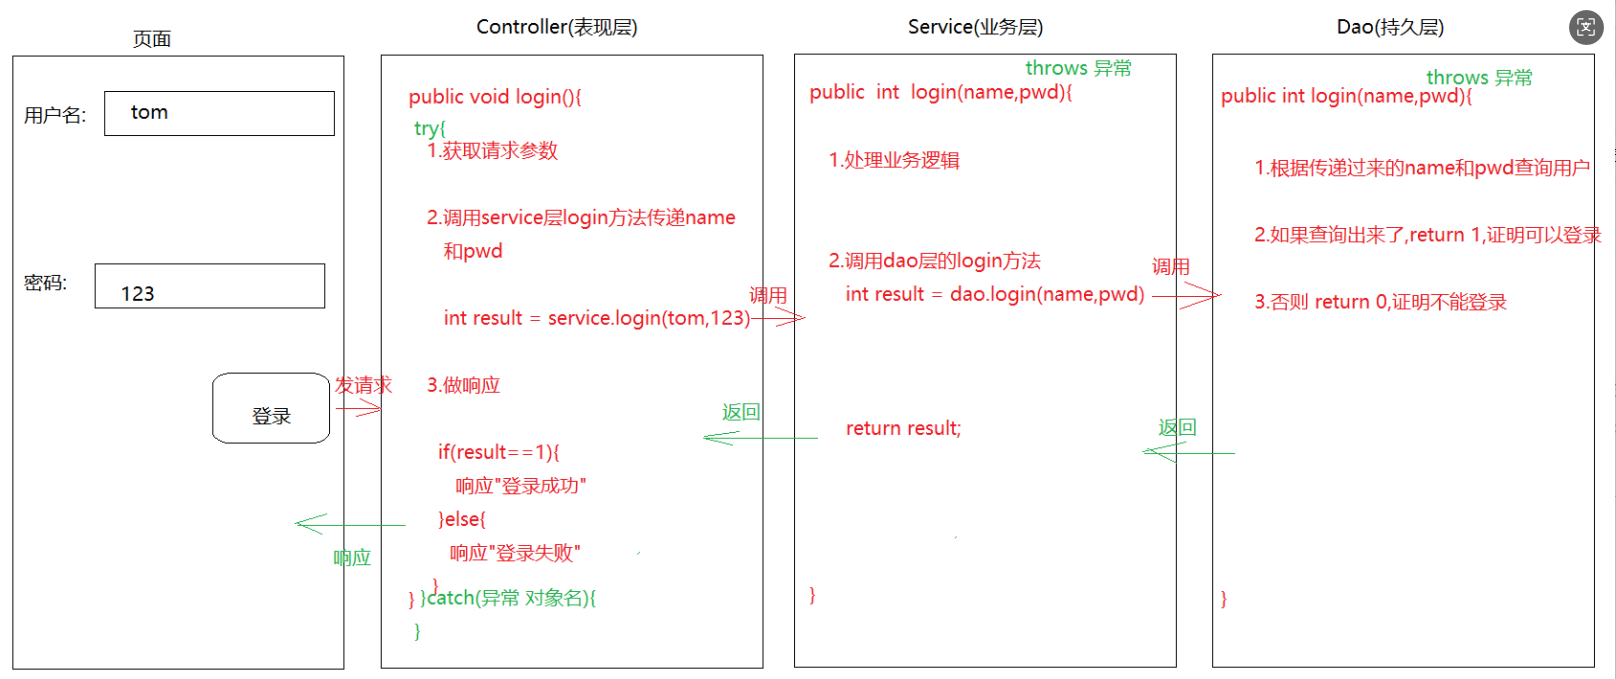
1.如果处理异常之后,还想让后续的代码正常执行,我们使用try...catch
2.如果方法之间是递进关系(调用),我们可以先throws,但是到了最后需要用try...catch做一个统一的异常处理
8.打印异常信息的三个方法
1.Throwable中的方法:
  String toString():打印异常类型和异常信息
  String getMessage():获取异常信息
  void printStackTrace():获取最详细的异常信息
public class Demo10Exception {
    public static void main(String[] args) {
        String s = "abc.txt1";
        try {
            //String str = null;
            //System.out.println(str.length());//空指针异常
            insert(s);
        } catch (FileNotFoundException e) {
            //System.out.println(e.toString());
            //System.out.println(e.getMessage());
            e.printStackTrace();//打印详细的异常信息
        }
        System.out.println("删除功能");
        System.out.println("修改功能");
        System.out.println("查询功能");

    }

    public static void insert(String s) throws FileNotFoundException {
        if (!s.endsWith(".txt")){
            throw new FileNotFoundException("文件找不到");
        }
        System.out.println("呵呵呵呵");
    }
}
第二章.BigInteger
1.BigInteger介绍
1.概述:有的整数非常大,大到连long类型的变量都接收不了,所以我们将这种大整数称之为"对象"-> BigInteger
2.作用:处理超大整数的
2.BigInteger使用
1.构造:
  BigInteger(String val) -> 字符串中的内容,必须是数字格式

2.常用方法:
  BigInteger add(BigInteger val) -> 加法
  BigInteger subtract(BigInteger val) -> 减法
  BigInteger multiply(BigInteger val) -> 乘法
  BigInteger divide(BigInteger val) -> 除法
 public class Demo01BigInteger {
    public static void main(String[] args) {
        BigInteger b1 = new BigInteger("12121212121212121212121212121212121");
        BigInteger b2 = new BigInteger("12121212121212121212121212121212121");
        BigInteger add = b1.add(b2);
        System.out.println("add = " + add);
        BigInteger subtract = b1.subtract(b2);
        System.out.println("subtract = " + subtract);
        BigInteger multiply = b1.multiply(b2);
        System.out.println("multiply = " + multiply);
        BigInteger divide = b1.divide(b2);
        System.out.println("divide = " + divide);
    }
}
int intValue()  -> 将BigInteger转成int型
long longValue()-> 将BigInteger转成long型
BigInteger可以接收的值:42亿的21亿次方 -> 内存扛不住这么大的数,所以我们认为BigInteger是无限大的
第三章.BigDecimal类
1.BigDecimal介绍
1.作用:用于解决float和double类型直接参与运算而出现的精度损失问题
2.BigDecimal使用
1.构造:
  BigDecimal(String val) 字符串内容必须是数字格式
2.方法:
  static BigDecimal valueOf(double b) 根据double类型的数据创建BigDecimal对象
  BigDecimal add(BigDecimal val) -> 加法
  BigDecimal subtract(BigDecimal val) -> 减法
  BigDecimal multiply(BigDecimal val) -> 乘法
  BigDecimal divide(BigDecimal val) -> 除法  -> 如果除不尽,会报错
  BigDecimal divide(BigDecimal divisor, int scale, RoundingMode roundingMode) -> 除法
                    a.divisor:代表的是除号后面的数
                    b.scale:保留几位小数
                    c.roundingMode:舍入方式 -> 类型是一个RoundingMode类型(它是一个枚举类)
                                   UP:向上加1
                                   DOWN:直接舍去
                                   HALF_UP:四舍五入
public class Demo01BigDecimal {
    @Test
    public void test1() {
       float a = 3.55F;
       float b = 2.12F;
       float sum = a+b;
       System.out.println(sum);

       float sub = a-b;
       System.out.println(sub);
    }

    @Test
    public void test2() {
        BigDecimal b1 = BigDecimal.valueOf(3.55);
        BigDecimal b2 = BigDecimal.valueOf(2.12);
        BigDecimal add = b1.add(b2);
        System.out.println(add);
        BigDecimal sub = b1.subtract(b2);
        System.out.println(sub);
        BigDecimal mul = b1.multiply(b2);
        System.out.println(mul);

        //如果除不尽,则抛出算数异常
        //BigDecimal div = b1.divide(b2);
        //System.out.println(div);

        BigDecimal div = b1.divide(b2, 2, RoundingMode.DOWN);
        System.out.println(div);
    }
}
第四章.Date日期类
1.Date类的介绍
1.概述:表示特定的瞬间,精确到毫秒
2.知识常识:
  a.1秒 = 1000毫秒
  b.北京时区:东八区 -> 东经116.20  北纬39.56
  c.时间原点:1970年1月1日 0时0分0秒
2.Date类的使用
Date() -> 根据当前系统时间创建Date对象
Date(long time) -> 根据指定的时间来创建Date对象 -> 传递毫秒值 -> 时间从时间原点开始算起
 @Test
 public void test01() {
     Date date1 = new Date();
     System.out.println(date1);

     System.out.println("==============");
     Date date2 = new Date(1000L);
     System.out.println(date2);
 }
3.Date类的常用方法
1. void setTime(long time) -> 设置时间 -> 时间从时间原点开始算起
2. long getTime() -> 获取时间对应的毫秒值
    @Test
    public void test02() {
        Date date1 = new Date();
        date1.setTime(1000L);
        System.out.println(date1);

        System.out.println("===============");
        Date date2 = new Date();
        System.out.println(date2.getTime());
    }
第五章.Calendar日历类
1.Calendar介绍
1.概述:日历类,是一个抽象类
2.获取对象:
  static Calendar getInstance()
3.方法:
  int get(int field) ->返回给定日历字段的值
  void set(int field, int value)  :将给定的日历字段设置为指定的值
  void add(int field, int amount) :根据日历的规则,为给定的日历字段添加或者减去指定的时间量
  Date getTime():将Calendar转成Date对象
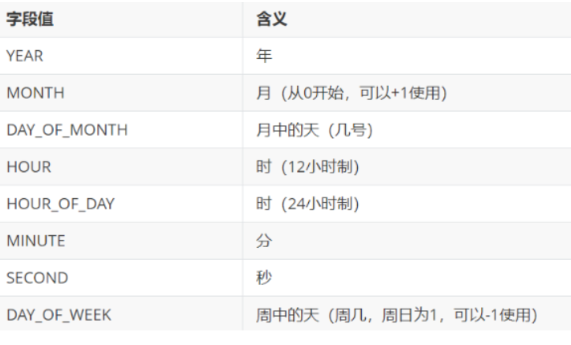
4.注意:Calendar中设置的月份比咱们实际月份少一个月
      Calendar : 0 1 2 3 4 5 6 7 8 9 10 11
         实际   : 1 2 3 4 5 6 7 8 9 10 11 12
    @Test
    public void test01() {
        Calendar calendar = Calendar.getInstance();
        System.out.println(calendar);
    }

    @Test
    public void test02() {
        Calendar calendar = Calendar.getInstance();
        //int get(int field) ->返回给定日历字段的值
        System.out.println(calendar.get(Calendar.YEAR));
        //void set(int field, int value)  :将给定的日历字段设置为指定的值
        calendar.set(Calendar.YEAR, 2000);
        System.out.println(calendar.get(Calendar.YEAR));
        //void add(int field, int amount) :根据日历的规则,为给定的日历字段添加或者减去指定的时间量
        calendar.add(Calendar.YEAR, -1);
        System.out.println(calendar.get(Calendar.YEAR));
        //Date getTime():将Calendar转成Date对象
        Date date = calendar.getTime();
        System.out.println(date);
    }
扩展方法:
void set(int year, int month, int date) 设置年月日
问题:定义一个year,计算这个年份的2月份有多少天
@Test public void test03() { //1.获取Calendar对象 Calendar calendar = Calendar.getInstance(); //2.定义一个year代表年份 int year = 2001; /* 3.设置年月日 由于Calendar类中的月份从0开始计算,所以2月为3月 */ calendar.set(year, 2, 1); //4.让day减1,就是2月的最后一天 calendar.add(Calendar.DATE, -1); //5.获取减1之后的日 int day = calendar.get(Calendar.DATE); System.out.println(day); }
第六章.SimpleDateFormat日期格式化类
1.SimpleDateFormat介绍
1.概述:日期格式化类
2.作用:
  a.可以将Date对象按照指定的格式格式化成一个字符串
  b.还可以将符合指定格式的字符串转回Date对象
3.创建:
  SimpleDateFormat(String pattern)
                   pattern:传递的是我们自己指定的格式
                           比如:yyyy-MM-dd HH:mm:ss

4.方法:
  String format(Date date) 将Date对象按照指定的格式转成字符串
  Date parse(String time) 将符合日期格式的字符串转回Date对象
| 时间字母表示 | 说明 |
|---|---|
| y | 年 |
| M | 月 |
| d | 日 |
| H | 时 |
| m | 分 |
| s | 秒 |
指定日期格式的时候,字母不能变,但是之间的连接符可以改变
    @Test
    public void test01(){
        SimpleDateFormat sdf = new SimpleDateFormat("yyyy-MM-dd HH:mm:ss");
        Date date = new Date();
        String time = sdf.format(date);
        System.out.println(time);
    }

    @Test
    public void test02() throws ParseException {
        SimpleDateFormat sdf = new SimpleDateFormat("yyyy-MM-dd HH:mm:ss");
        String time = "2020-01-01 12:12:12";
        Date date = sdf.parse(time);
        System.out.println(date);
    }
第七章.JDK8新日期类
1. LocalDate 本地日期
1.1.获取LocalDate对象
1.概述:是一个不可变的日期时间对象,表示日期,通常被视为年月日
2.获取:
  static LocalDate now() 从默认时区的系统时钟获取当前日期
  static LocalDate of(int year, int month, int dayOfMonth) 根据指定的年月日创建LocalDate对象
    @Test
    public void test01() {
        //static LocalDate now() 从默认时区的系统时钟获取当前日期
        LocalDate local1 = LocalDate.now();
        System.out.println(local1);
        //static LocalDate of(int year, int month, int dayOfMonth) 根据指定的年月日创建LocalDate对象
        LocalDate local2 = LocalDate.of(2026, 1, 24);
        System.out.println(local2);
    }
1.2.LocalDateTime对象
1.概述:是一个不可变的日期时间对象,代表日期时间,通常被视为年 - 月 - 日 - 时 - 分 - 秒
2.获取:
  static LocalDateTime now()
  static LocalDateTime of(int year, int month, int dayOfMonth, int hour, int minute, int second)
    @Test
    public void test01() {
        //static LocalDateTime now()
        LocalDateTime local1 = LocalDateTime.now();
        System.out.println(local1);
        //static LocalDateTime of(int year, int month, int dayOfMonth, int hour, int minute, int second)
        LocalDateTime local2 = LocalDateTime.of(2026, 1, 24, 10, 10, 10);
        System.out.println(local2);
    }
1.3.获取日期字段的方法 : 名字是get开头
int getYear()->获取年份
int getMonthValue()->获取月份
int getDayOfMonth()->获取月中的第几天
    @Test
    public void test01() {
        LocalDate localDate = LocalDate.now();
        //int getYear()->获取年份
        System.out.println(localDate.getYear());
        //int getMonthValue()->获取月份
        System.out.println(localDate.getMonthValue());
        //int getDayOfMonth()->获取月中的第几天
        System.out.println(localDate.getDayOfMonth());
    }
1.4.设置日期字段的方法 : 名字是with开头
LocalDate withYear(int year):设置年份
LocalDate withMonth(int month):设置月份
LocalDate withDayOfMonth(int day):设置月中的天数
    @Test
    public void test02() {
        LocalDate localDate = LocalDate.now();
        //LocalDate withYear(int year):设置年份
        //LocalDate localDate1 = localDate.withYear(2020);
        //System.out.println(localDate1);
        //LocalDate withMonth(int month):设置月份
        //LocalDate localDate2 = localDate1.withMonth(5);
        //System.out.println(localDate2);
        //LocalDate withDayOfMonth(int day):设置月中的天数
        //LocalDate localDate3 = localDate2.withDayOfMonth(10);
        //System.out.println(localDate3);

        //链式调用
        LocalDate localDate1 = localDate.withYear(2020).withMonth(5).withDayOfMonth(10);
        System.out.println(localDate1);
    }
1.5.日期字段偏移
设置日期字段的偏移量,方法名plus开头,向后偏移
设置日期字段的偏移量,方法名minus开头,向前偏移
    @Test
    public void test03() {
        LocalDate localDate = LocalDate.now();
        //向后偏移
       // LocalDate localDate1 = localDate.plusYears(1);
        //往前偏移
        LocalDate localDate1 = localDate.minusYears(1);
        System.out.println(localDate1.getYear());
    }
2.Period和Duration类
2.1 Period 计算日期之间的偏差
1.作用:计算年月日时间偏差
2.方法:
  static Period between(LocalDate d1,LocalDate d2):计算两个日期之间的差值

  getYears()->获取相差的年
  getMonths()->获取相差的月
  getDays()->获取相差的天
    @Test
    public void testPeriod(){
        LocalDate local1 = LocalDate.of(2023, 10, 10);
        LocalDate local2 = LocalDate.of(2024, 11, 9);
        Period period = Period.between(local1, local2);
        System.out.println(period.getYears());
        System.out.println(period.getMonths());
        System.out.println(period.getDays());
    }
2.2 Duration计算时间之间的偏差
1.作用:计算精确时间
2.方法:
  static Duration between(Temporal startInclusive, Temporal endExclusive)  -> 计算时间差

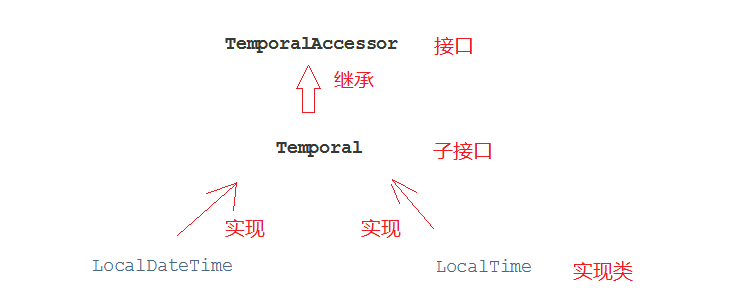
  Temporal是一个接口,常用的实现类:LocalDate,LocalDateTime ,但是Duration是计算精确时间偏差的,所以这里传递能操作时分秒的LocalDateTime对象

3.利用Duration获取相差的时分秒 -> to开头
  toDays() :获取相差天数
  toHours(): 获取相差小时
  toMinutes():获取相差分钟
  toMillis():获取相差秒(毫秒)
    @Test
    public void testDuration(){
        LocalDateTime local1 = LocalDateTime.of(2023, 10, 10, 10, 10, 10);
        LocalDateTime local2 = LocalDateTime.of(2024, 11, 11, 11, 11, 11);
        Duration duration = Duration.between(local1, local2);
        System.out.println(duration.toDays());
        System.out.println(duration.toHours());
        System.out.println(duration.toMinutes());
        System.out.println(duration.toMillis());
    }
计算年月日:Period
计算精确时间偏差:Duration
3.DateTimeFormatter日期格式化类
1.获取:
  static DateTimeFormatter ofPattern(String pattern)   -> 获取对象,指定格式
2.方法:
  a.String format(TemporalAccessor temporal)-> 将日期对象按照指定的规则转成String
    TemporalAccessor:是一个接口,实现类有LocalDate以及LocalDateTime

  b.TemporalAccessor parse(CharSequence text)-> 将符合规则的字符串转成日期对象
                           CharSequence是一个接口,它有一个实现类-> String
  c.LocalDateTime类中的方法:static LocalDateTime parse(CharSequence text,DateTimeFormatter formatter)-> 将符合规则的字符串转成日期对象
    @Test
    public void test01() {
        DateTimeFormatter dtf = DateTimeFormatter.ofPattern("yyyy-MM-dd HH:mm:ss");
        LocalDateTime localDateTime = LocalDateTime.now();
        String time = dtf.format(localDateTime);
        System.out.println(time);

    }
    @Test
    public void test02() {
        DateTimeFormatter dtf = DateTimeFormatter.ofPattern("yyyy-MM-dd HH:mm:ss");
        String time = "2020-01-01 12:12:12";
        //TemporalAccessor temporalAccessor = dtf.parse(time);
        //System.out.println(temporalAccessor);
        //LocalDateTime localDateTime = LocalDateTime.from(temporalAccessor);
        //System.out.println(localDateTime);
        LocalDateTime localDateTime = LocalDateTime.parse(time, dtf);
        System.out.println(localDateTime);
    }
第八章.包装类
1.基本数据类型对应的引用数据类型(包装类)
1.概述:基本类型对应的那个类
2.为啥要使用包装类:
  当我们调用方法的时候,人家方法的形参或者返回值类型都要求使用包装类,所以我们就需要将基本类型转成包装类去返回,去传参
  而且包装类里面有很多的方法可以去操作我们的数据
| 基本类型 | 包装类 |
|---|---|
| byte | Byte |
| short | Short |
| int | Integer |
| long | Long |
| float | Float |
| double | Double |
| char | Character |
| boolean | Boolean |
2.Integer的介绍以及使用
2.1.Integer基本使用
1.概述:Integer是int对应的包装类
2.构造:
  Integer(int i)
  Integer(String s) -> s的内容必须是数字格式
3.方法:
  static Integer valueOf(int i)
  static Integer valueOf(String s) -> s的内容必须是数字格式
 @Test
 public void test01(){
     //构造方法创建Integer对象
     //Integer i1 = new Integer(1);
     //System.out.println("i1 = " + i1);

     //通过静态方法创建Integer对象
     Integer i1 = Integer.valueOf(1);
     System.out.println("i1 = " + i1);

     Integer i2 = Integer.valueOf("11111");
     System.out.println("i2 = " + i2);
 }
1.装箱:将基本类型转成对应的包装类 ->调用别人的方法,方法要求我们传递包装类
  static Integer valueOf(int i)

2.拆箱:将包装类转成对应的基本类型 -> 如果需要包装类表示的数据进行运算,就需要转成基本类型
  int intValue()
@Test
public void test02(){
   //装箱
    Integer i = Integer.valueOf(10);
    System.out.println("i = " + i);

    //拆箱

    int j = i.intValue();
    System.out.println("j+1 = " + j + 1);
}
2.2.自动拆箱装箱
将来拆箱和装箱大部分时间是自动的
    @Test
    public void test03() {
        Integer i = 10;
        i+=10;
        System.out.println(i);
    }

@Test
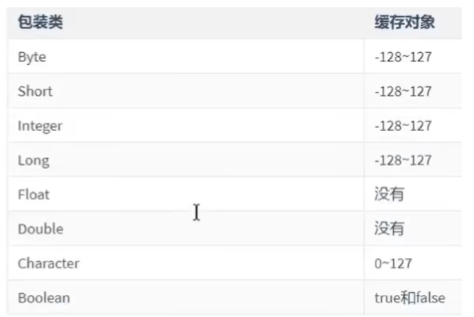
public void test04() {
 Integer i1 = 100;
 Integer i2 = 100;
 System.out.println(i1 == i2);//true

 Integer i3 = 200;
 Integer i4 = 200;
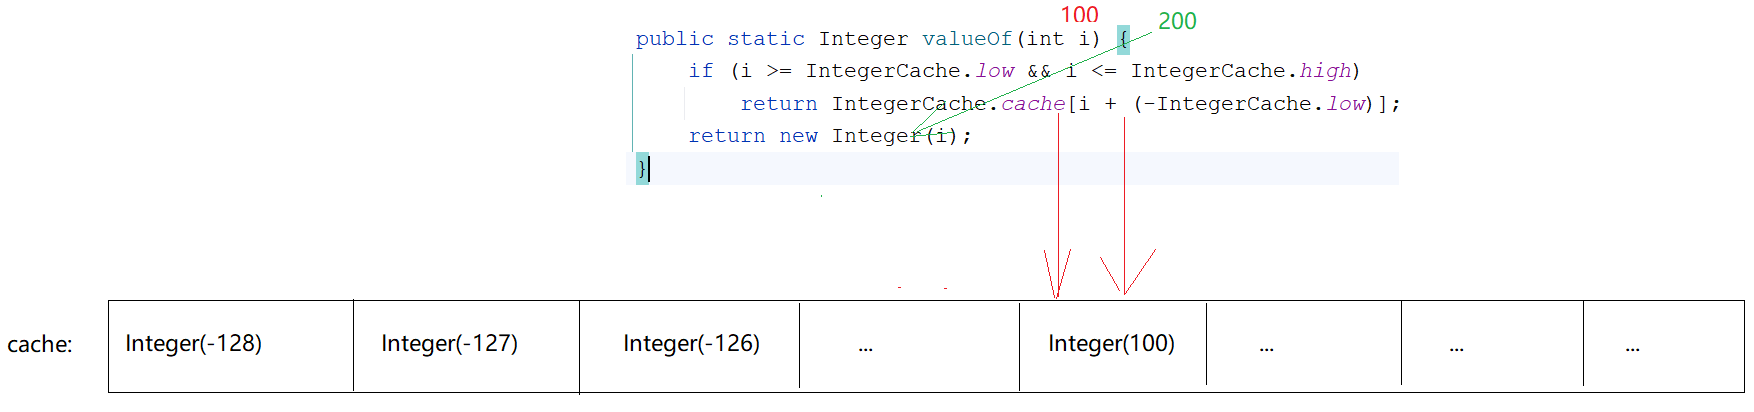
 System.out.println(i3 == i4);//false
}
public static Integer valueOf(int i) {
 if (i >= IntegerCache.low && i <= IntegerCache.high)
     return IntegerCache.cache[i + (-IntegerCache.low)];
 return new Integer(i);
}
3.基本类型和String之间的转换
3.1 基本类型往String转
1.方式1: 拼接
2.方式2:String中的静态方法:
       static String valueOf(int i)
    @Test
    public void test05() {
        int i = 10;
        String s = i + "";
        System.out.println(s+1);

        System.out.println("===============");

        String s1 = String.valueOf(10);
        System.out.println(s1+1);
    }
3.2 String转成基本数据类型
每一个包装类中都有一个类似的方法:parseXXX()
| 位置 | 方法 | 说明 |
|---|---|---|
| Byte | static byte parseByte(String s) | 将字符串转成byte类型 |
| Short | static short parseShort(String s) | 将字符串转成short类型 |
| Integer | static int parseInt(String s) | 将字符串转成int类型 |
| Long | static long parseLong(String s) | 将字符串转成long类型 |
| Float | static float parseFloat(String s) | 将字符串转成float类型 |
| Double | static double parseDouble(String s) | 将字符串转成double类型 |
| Boolean | static boolean parseBoolean(String s) | 将字符串转成boolean类型 |
    @Test
    public void test06() {
        int i = Integer.parseInt("10");
        System.out.println(i+1);
    }
1.将来我们定义javabean的时候,里面的属性如果是基本类型的,我们都要将其变成包装类类型
2.原因:
a.包装类中有方法可以直接操作数据
b.将来我们学框架的时候,人家都要求用包装类型
c.将来我们的javabean是和数据库表对应的,javabean中的属性值是和表中的数据对应
如果表的主键列是主键自增的约束,我们使用包装类类型在添加的数据比较方便

主键自增长列中的数据在添加的时候不需要我们自己维护
@Data @NoArgsConstructor @AllArgsConstructor public class User { private Integer uid;//null private String username; private String password; }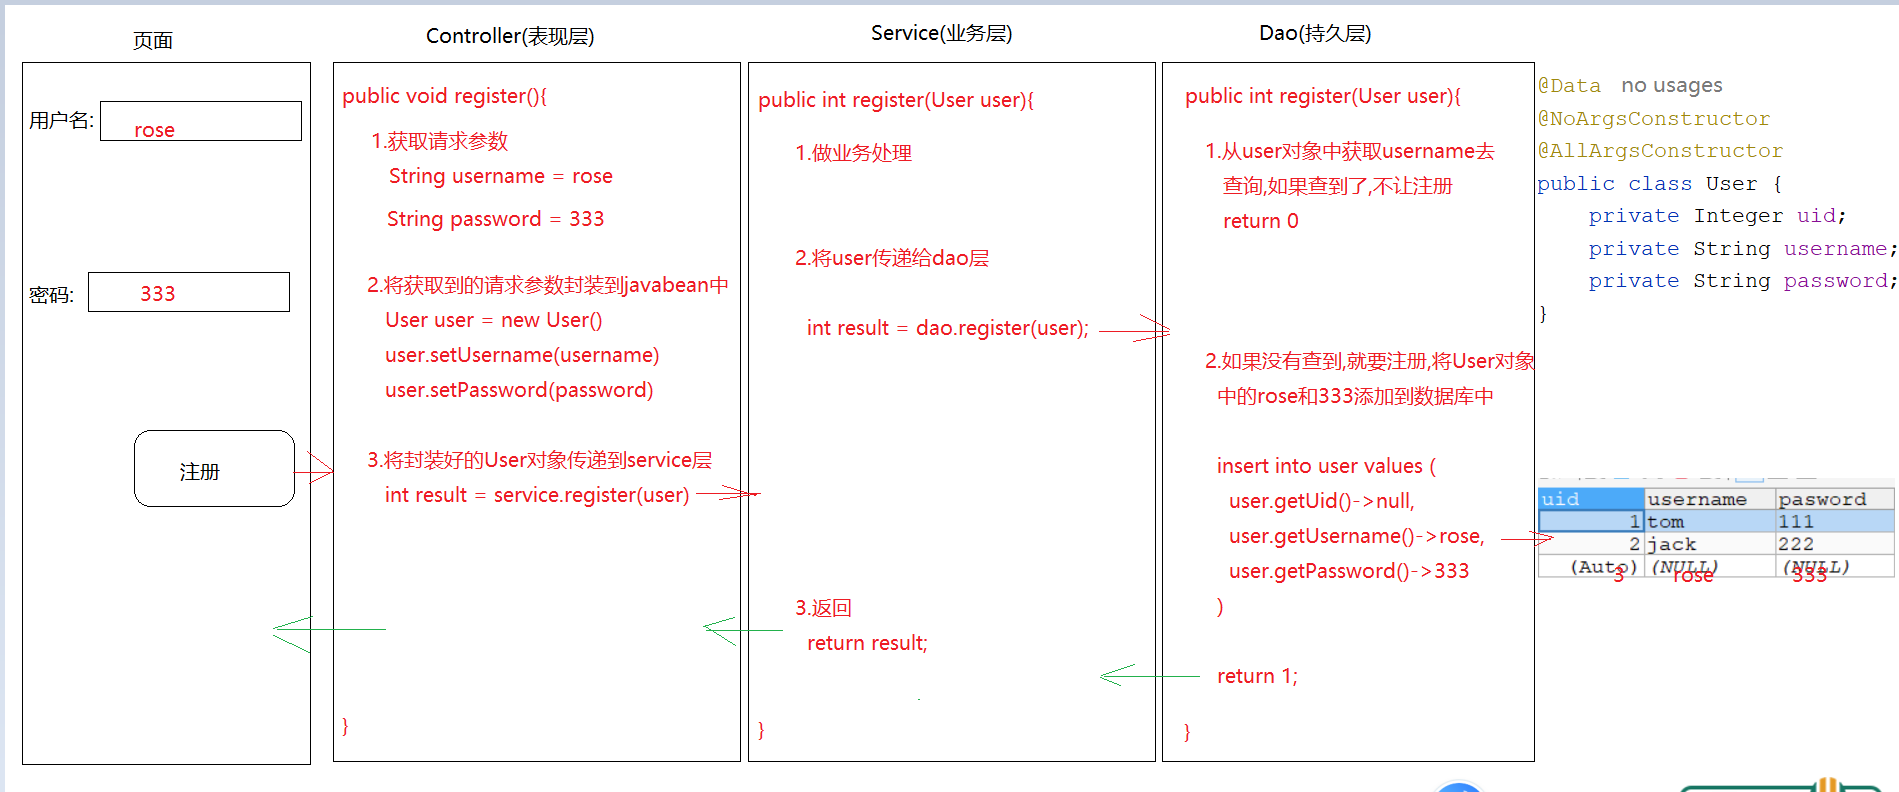




评论